Brenda's Wedding Blog | Fresh Ideas for Creative Weddings
061416-southern-wedding-party-confetti.jpg

wedding blog + planning guide for creative weddings | inspiration for DIY Brides

Brenda's Wedding Blog is your online resource for planning your dream elegant wedding. Helping you find the "wow" in weddings.

Posts tagged daisy trail
DIY Wedding Stationery Set How-To : save the date, invite + favor box

I have a fun post to start your Thursday off with - it's a DIY Wedding Stationery Set that uses Serif’s CraftArtist software and ‘Love Birds’ digikit, which can be downloaded from the social crafting website DaisyTrail.com. Below is a step-by-step guide with illustrations. You can either create the card using the free version of the software CraftArtist Compact or you can choose to buy CraftArtist Professional. The Love Birds digikit is available to purchase from DaisyTrail.com for $4.99.

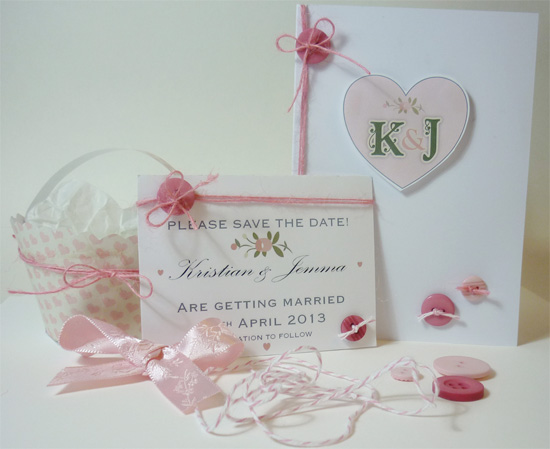
Wedding Stationery Set Created using “Love Birds” digikit and CraftArtist Compact or CraftArtist Professional. Other supplies used: Inkjet paper/card, Basic card stock, Selection of twine or ribbon, Selection of small buttons, Adhesive, foam pads, or basic paper glue will work fine, Scissors and/or paper trimmer
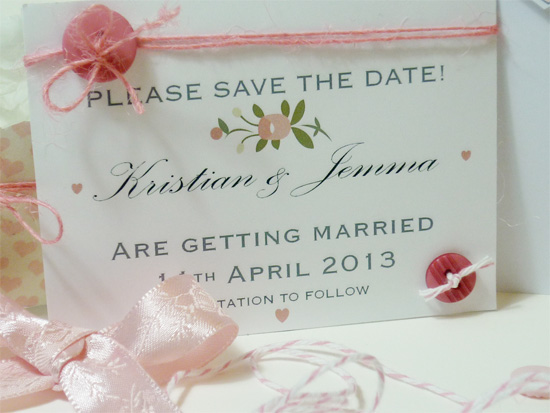
Save the Date Card

  • Starting with a blank project, choose an A4 size template.
  • Create a 4” x 3” basic rectangle as base for the card with a white fill and black line. This will be easier for cutting out after printing.
  • Add the text and then choose your fonts and lay out the text. Leave a bit of a gap at the top of the card to add some ribbon on embellishments after printing.
  • The hearts were created using a basic heart shape and color was picked from the floral embellishment in the digikit.
  • Once the card is finished, group everything so you can copy and paste to cover the A4 sheet.
  • Print on white inkjet cardstock. An off white or cream would also be nice for wedding stationery depending on your color/theme.
  • Use a paper trimmer to get more accurate cutting and it saves a lot of time if you have loads of cards to do.
  • Thread a small piece of twine through one of the buttons for the bottom corner. Glue in place.
  • Wrap twine around the top of the card and secure with a knot. Add a little bit of glue on the back of the card to keep the twine in place. Tie the button in place finishing with a simple tied bow.

*** Top Tip: Why not add some magnetic tape to the back of the card?  Available in most craft stores, this will be great for your family and friends to stick it to their fridge!
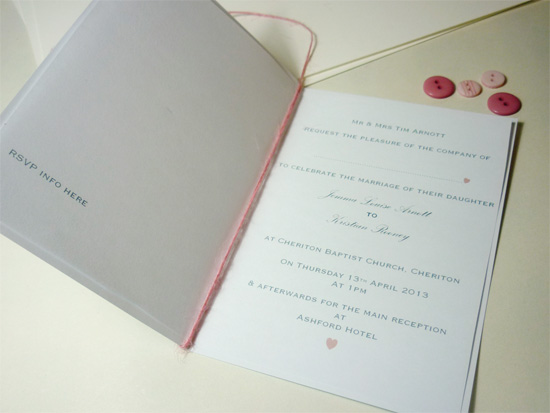
Wedding Invitation

  • Start off by making the card insert. Shown with an A6 card insert and text using the same fonts as the “Save the Date” card.
  • Print on high quality white inkjet paper and folder ready to insert into the card.
  • For the wedding invitation, choose an A6 card template and use the same embellishment from the Love Bird digikit. Also added are some letters and a heart.
  • Print them on a separate sheet and add them using foam pads to add a bit of dimension.
  • Once printed and folded, add the buttons and twine much the same way as “Save the Date” card. For added dimension you can use foam pads to stick the hearts on.

Favor Box

  • This was created using the cupcake holder template with a background from the Love Birds digikit.
  • Print on card and cut out and then assemble. Some glue and a little bit of tape was used to hold in place.
  • Draw a circle using the base of the cupcake holder (once assembled) as a template.
  • Cut out and secure holder to the base – again, using glue and tape.
  • Create a little handle from a printed out A4 sheet of card. Measure approximately 1/2” and then cut and secure using tape.
  • Add your own embellishments and tissue paper to finish off. Shown with a couple of buttons and some pink twine to match the invites.

*** Top Tip: You could also add names to the favor boxes so they double up as place cards. Use metallic pens for added sparkle and glamour.

The above design is by Diane Rooney. More information on CraftArtist can be found online.

DaisyTrail.com is an affiliate of Brenda's Wedding Blog

Top Tips for a Magical Valentine’s Day

This morning I have a special guest post to get you ready for Valentine's Day next week. The article is courtesy of Daisy Trail who carries everything you need for Digital Scrapbooking, Crafting, Greeting Cards, Baby Photobooks, DIY Wedding Invitations and more.

---------------------

There’s no need to go crazy and spend loads of money. Often the best and most thoughtful gifts cost no money at all. For some inspiration, check out these top ten tips for making Valentine’s Day special this year – without breaking the bank.

1. Less is more
Rather than giving your loved one a dozen red roses, why not give her just one? The thought is there, the intent is the same, and it will be received just as gratefully.

2. Do something unexpected
If you’re normally the lazy one of the couple and spend more time getting out of the housework than doing it, why not surprise your partner with a clean house and dinner on the table when they get home?

3. A handmade card is best
Making your own card is an easy way to score brownie points and it doesn’t necessarily cost more than a store-bought card. Get some ideas from the supermarket, and recreate your favorite card using small crafty items that mean something to you both.

4. Thoughtful gifts
Think about what is special to the pair of you, and draw on this when picking a gift. Choose something silly that only the two of you know about, or perhaps buy a gift bag and fill it with of all their favorite things.

5. Love vouchers
An inexpensive gift that will work wonders – create your own vouchers for something you know your partner will love. For example, ‘an hour’s massage’ or ‘a dinner cooked by me every night for a week’.

6. Spend time together
Why not suggest the two of you have a night in, but with no interruptions? Plan in all the things you love to do together but rarely get time to do such having a relaxing bath or a battle on the Nintendo Wii!

7. Have a buffet style feast
If you are a foodie, get together all of your favorite foods and organize a buffet style feast. It’s a great excuse to spend time together to enjoy your favorite food with your favorite person.

8. Reminisce
Get out old photo albums or browse through computer folders of images together and reminisce about times gone by. You’ll be surprised about how many memories you’ll unearth and how much you’ll laugh looking through them together.

9. Candlelit meal for two
Instead of sitting in front of the TV to eat your dinner, why not set the table, light some candles, open a bottle of wine and enjoy each other’s company? It doesn’t have to cost a fortune. Whatever you had planned to eat that night is fine – just making the time to be together and talk will make it romantic.

10. Write a love list
Write 12 reasons why you love your partner inside their card – one reason for every month of the year. They don’t have to be huge reasons, but little quirks that you love are equally as endearing.

Whatever you decide to do, the little touches can add up to the best Valentine’s Day you’ve ever had.

If you’d like to make your own card, gift bags and decorations for free, download CraftArtist Compact and the Valentine’s 2012 kit from www.daisytrail.com.

DIY Wedding Invitations

Daisy Trail is an affiliate with Brenda's Wedding Blog + Best Wedding Sites